No-weld Tall Bike
My idea for this Tall Bike, was for it to be a one-day project, to see if it was possible to create a tall bike without using a welder at all.
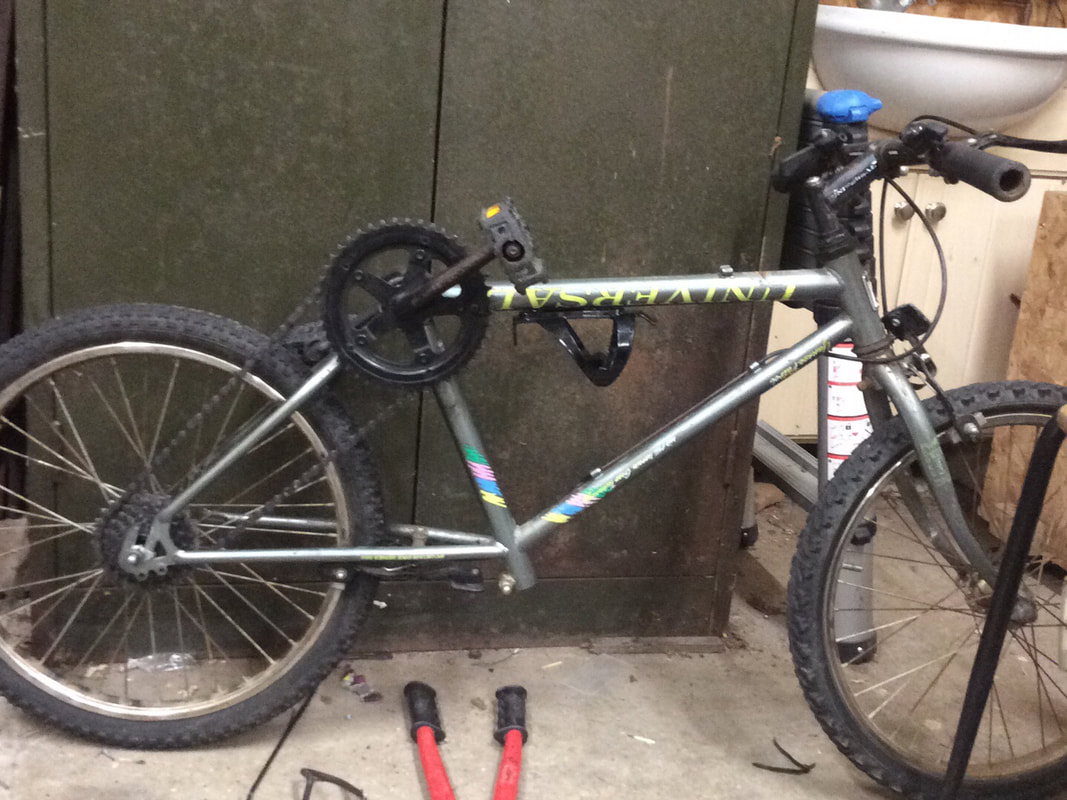
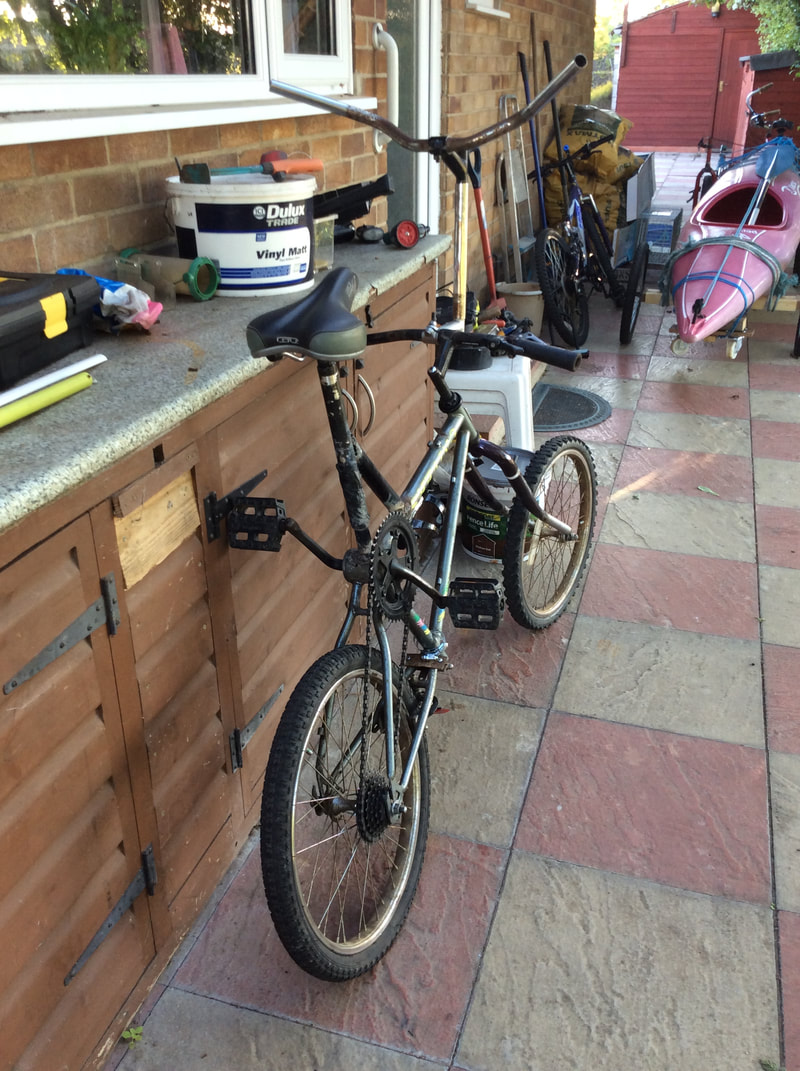
First of all, I grabbed an old Mtb-Bmx hybrid bike, which ironically was my bike as a kid. Then I took out the seat post, turned the frame upside down, and threaded the forks back through the head-tube the wrong way round.
I also had to switch around the bottom bracket and rear wheel to compensate. With this new design, the cranks were at the top of the bike, and nothing had been abnormally or externally attached.
However, because of the wheel being turned around, I could no longer insert a rear derailleur for tension or gear shifting. Therefore the bike is permanently stuck on this gear, as on any other gear the chain seems to come off.
I tried riding it, but of course there was nowhere to sit, not to mention the fact that I had to reach all the way down to the handlebars to steer. It was a feat of impossibility.
I sought out advice from fellow FreakBike Builders on the net, and eventually managed to work out how I would do it.
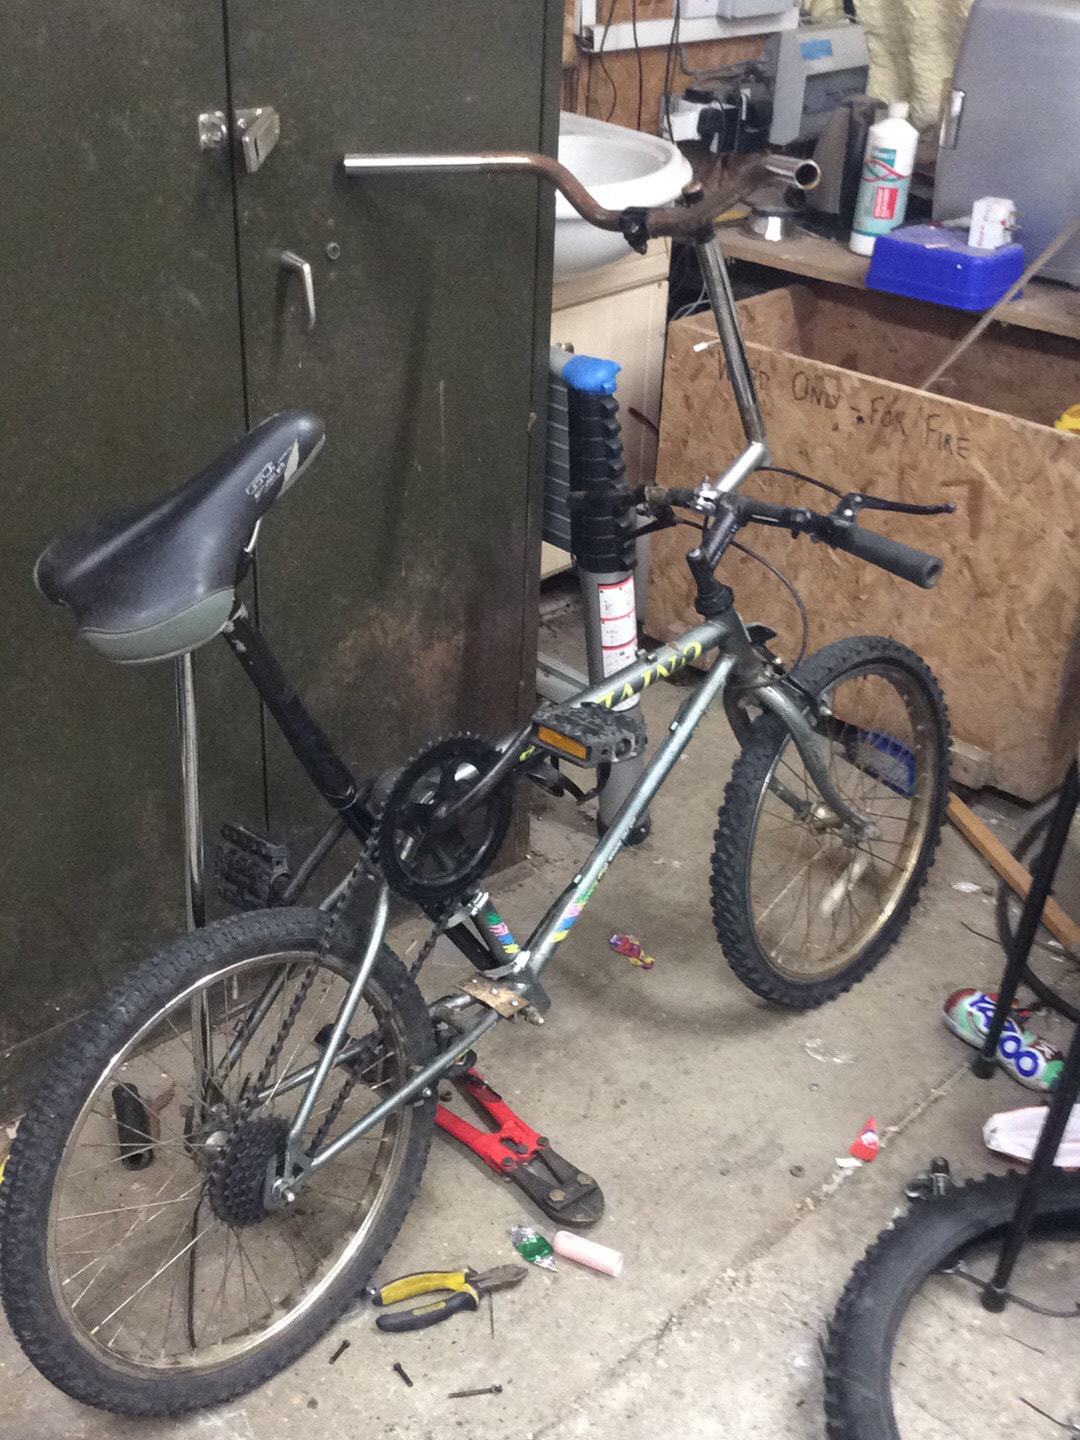
The easy part was the handlebars: Simply get a stem headset, and attach it upside-down to the handlebars of the bike, inserting the upwards-facing part into a cut-off seat tube.
Then I did the same in the other end of the seat tube, and used the headsets to tighten them enough to stay in place. Then I added a second pair of handlebars onto the 4th stem headset.
As for the seat, this was going to be trickier, especially without welding. I took a look at the old-style chopper bicycles, with their banana seats and sissy bars, and thought about creating something like that.
I ended up duct-taping a tube to the bottom of the seat-tube, elongating it enough to be fastened in parallel with the seat-tube of the frame. Then I went out and purchased a few hose clamps to keep it in place. I also added an old broomstick tube between the rear dropout and the seat, for some extra support.
Maybe a few welds...
I gave it a test ride, and despite being incredibly wobbly, it worked perfectly. Mechanically speaking, it was just a normal bike. Turned upside-down. With a few modifications.
This wasn't enough. It didn't seem finished. It was working, but I still felt a sense of un-accomplishment.
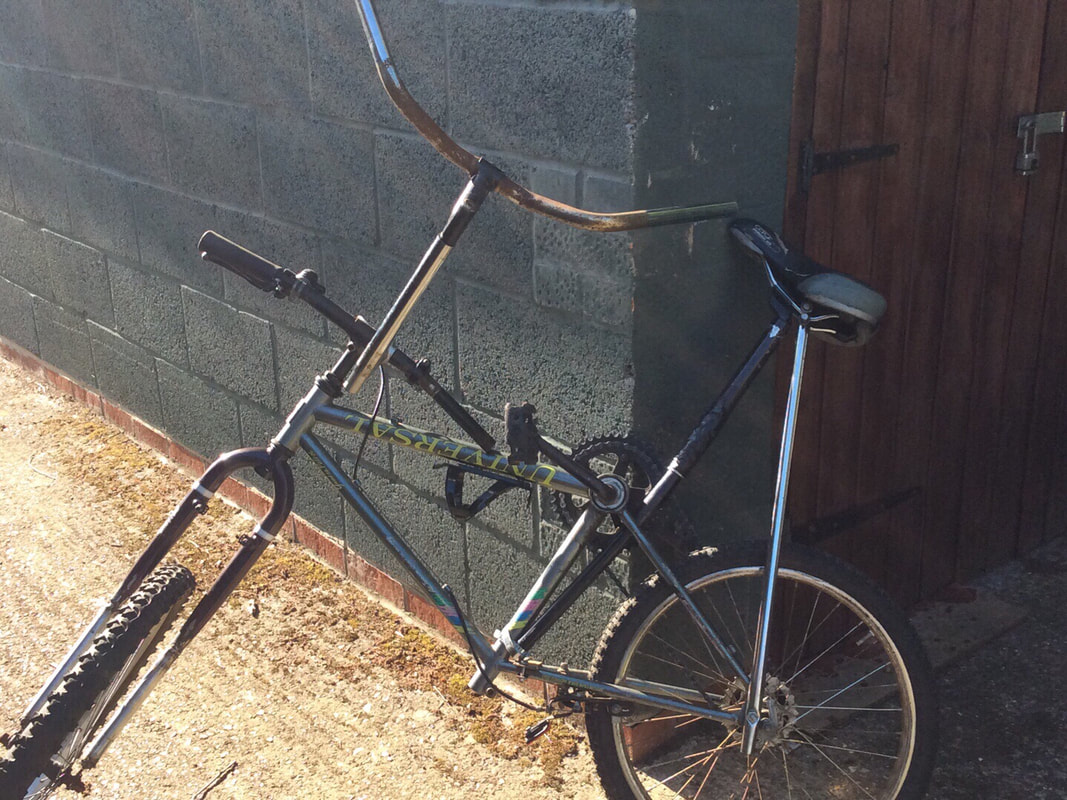
So I grabbed my MIG Welder, and searched for potential additions I could make. I thought back to my ideas about a chopper bicycle, and decided to elongate the forks. All I had to do was add a bit of tube (taken from handlebars) onto the ends of the forks, ensuring they were the same distance apart to allow the wheel to turn.
Of course this meant I now couldn't have any gears or brakes at all. But that didn't matter, at least my new chopper forks looked pretty cool... and were insanely complex to balance with.
This wasn't enough. It didn't seem finished. It was working, but I still felt a sense of un-accomplishment.
So I grabbed my MIG Welder, and searched for potential additions I could make. I thought back to my ideas about a chopper bicycle, and decided to elongate the forks. All I had to do was add a bit of tube (taken from handlebars) onto the ends of the forks, ensuring they were the same distance apart to allow the wheel to turn.
Of course this meant I now couldn't have any gears or brakes at all. But that didn't matter, at least my new chopper forks looked pretty cool... and were insanely complex to balance with.
With the chopper forks in, the mini tallbike was now leant extensively back, meaning I could hardly ride it without falling of the back.
So I scrapped my no-weld idea, and took it back to the workshop again. I was planning to just weld the seat-post directly to the bottom bracket, and triangulate it with a small support tube.
It was a 2 hour weld project, and I didn't encounter any major issues besides the fact that I had exhausted all of my flux welding wire by then.
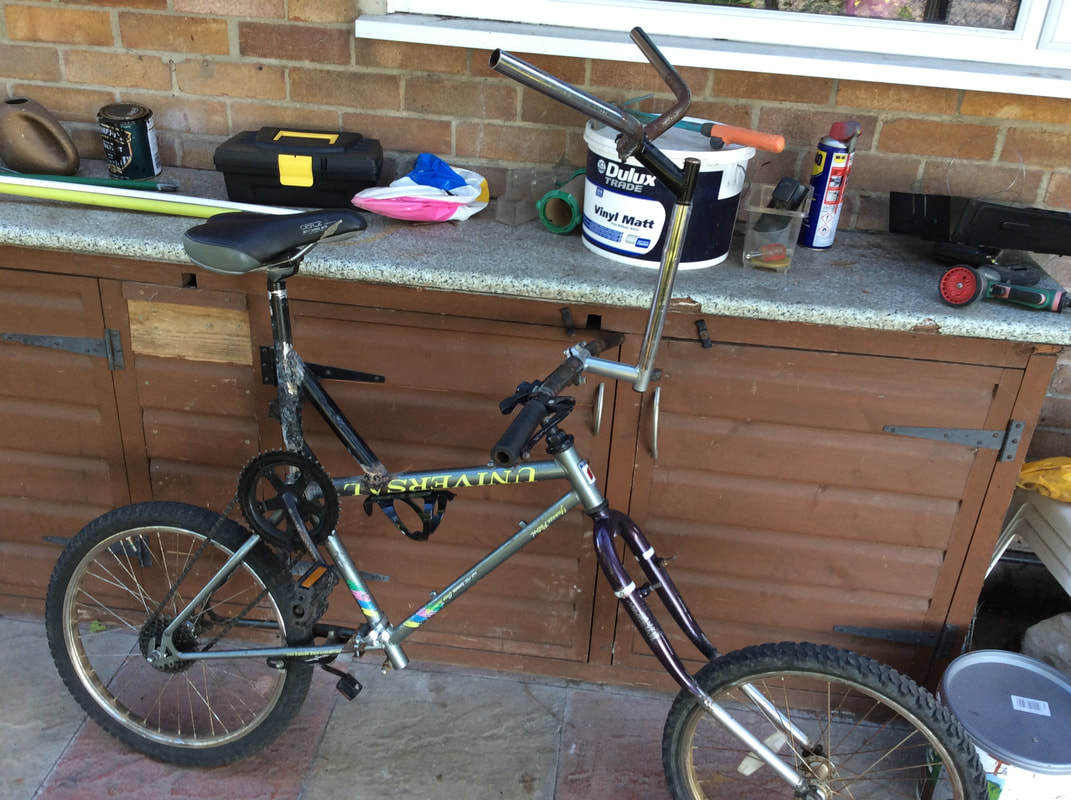
In conclusion, Tall Bike Mark III works perfectly, without any gears or brakes whatsoever. It has become a hilarious event for me to watch friends and random people who ask to ride it, try and fail to mount or ride it.
So far, I'm the only person in the past 4 months since it was built, who is able to ride is successfully. I'll give £5 to whoever manages to ride this bike at least 25 metres in a straight line without putting their foot down, because it is very hard to balance.
This is my only Tall Bike that only has 1 frame. These are known as Inverted Tall Bikes. The aspect which probably makes it near-impossible to ride, is the fact that it's a kid's frame, and the chopper forks making steering a nightmare.
I do ride this bike around occasionally, but I usually only take it out upon request, as it is my slowest bike due to having no gears, so I only take it out if I want to have the joy of seeing somebody fail again and again on this hilarious contraption. ;)
Get In Touch.
|
If you want to get in contact for queries, info or just to talk, please email me (button below), or press the social media icons to be taken to my profiles. Please make sure you make it known you are contacting me about the website, otherwise unknown messages are marked as spam.
Always happy to help and answer questions, feel free to get in touch. |
